


Introduction
About Vue.js
Vue.js is an open-source JavaScript framework for building web user interfaces. It is lightweight, easy to learn, and integrates well with other libraries or frameworks.
Check Vue.js official websiteAbout Nuxt.js
Nuxt.js is a framework for creating server-rendered Vue.js applications. It simplifies the development of universal or single-page Vue apps, and offers powerful features such as automatic code-splitting and server-side rendering.
Check Nuxt.js official websiteAbout Hook.Notifier
Hook.Notifier is a notification collector, it allows you to send, store and organize useful notifications on your phone from various services.
Check Hook.Notifier official websiteReceive notifications from Vue and Nuxt
Disclaimer
We will show you how to send notifications from your applications in several ways. Note that if you don't go through a server, that the browser takes care of sending the notifications as it can be easily the case with these technologies, this represents a security risk for your Hook.Notifier credentials. This can however be convenient, we suggest if this happens, a reset of your credentials in your account. Anyway, your Hook.Notifier account remains safe.
The easy and unsafe way for Vue & Nuxt
As mentioned above, we will start with a simple and straightforward method that will work on both Vue and Nuxt. It is your user's browser that will perform the notification.
In this example, we will make a simple button that sends a notification.
1. Install the official npm library Hook.Notifier
Our library is simple, light, without any dependencies and makes your integration work easier. Add it to your package via the official npm repository. You can also find the official documentation on the npm page.
[[bash]]yarn add hook.notifieror
[[bash]]npm install --save hook.notifier2. Import of the library and initialization
This tutorial is made on the version 3 of Vue, with the composition API, however, the integration is very simple, you will have no trouble to transpose it on the API option of vue.js.
Let's import our libraries and initialize our HookNotifier object that will connect your application to Hook.Notifier, check if your credentials are good and pre-configure your sending parameters.
[[html]]<script setup>
  import HookNotifier from 'hook.notifier';

  const hn = new HookNotifier({
    identifier: %_YOUR_IDENTIFIER_%,
    key: %_YOUR_KEY_%,
  });
</script>
Let's take a look at the constructor's parameters.
| Parameter | Type | Description |
identifier | String | Required — This is your identifier you can find it in your Hook.Notifier account. |
key | String | Required — This is your key you can find it in your Hook.Notifier account. |
tags | String,String,... | Tags added to the notification for filteringdefault: "general" |
color | Color String (#000000) | Color of the notification, icon background on phonedefault: "#FFC107" |
sendToTeam | Boolean | Sends notification to you and your teamdefault: falsePremium feature |
sound | Boolean | Activate the sound of the notification on phonedefault: true |
preventData | Boolean | Disable data storage in the notificationdefault: false |
These default settings can be changed each time a notification is sent.
3. Configuring the send notification function
We create a simple method to trigger a test notification for the demo, you can play with it, change the settings and add dynamism.
[[javascript]]<script setup>
  import HookNotifier from 'hook.notifier';

  const hn = new HookNotifier({
    identifier: %_YOUR_IDENTIFIER_%,
    key: %_YOUR_KEY_%,
  });

  const sendMyFirstNotification = () => {
    hn.sendNotification({
      object: `You've clicked on the button`,
      body: 'Congratulation',
      tags: 'test,vuejs',
    });
  }
</script>
Here are the parameters of the function, of course, if you have pre-configured parameters in your constructor, they will be taken by default, but overloaded if you redefine them here:
| Parameter | Type | Description |
object | String | Title of the notificationrequired |
body | String | Content of the notificationrequired |
tags | String,String,... | Tags added to the notification for filteringdefault: "general" |
color | Color String (#000000) | Color of the notification, icon background on phonedefault: "#FFC107" |
redirectUrl | Url String | Url of redirection when clicking on the notificationPremium feature |
image | Url String | Include an image inside your notification |
sendToTeam | Boolean | Sends notification to you and your teamdefault: falsePremium feature |
sound | Boolean | Activate the sound of the notification on phonedefault: true |
preventData | Boolean | Disable data storage in the notificationdefault: false |
innerData | JSON | Datas stored inside the notification. Premium feature |
4. Triggering and testing
We add a simple button and it's done!
[[html]]<template>
  <button @click="sendMyFirstNotification">Send Notification</button>
</template>

<script setup>
  ...
</script>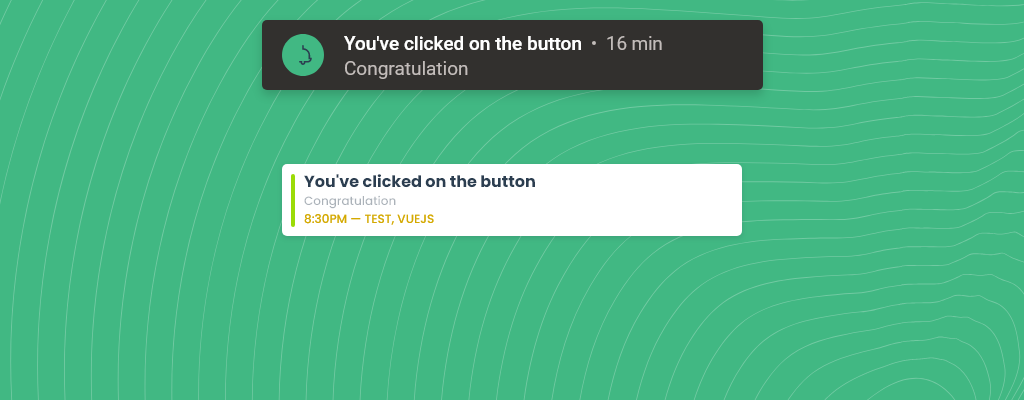
The safe way for Nuxt
As you have understood, the above method is a simple one, but we would like to tell you again, your credentials will be exposed if the user of your site examines the XHR requests issued from your site, so he will be able to get your credentials and exploit them. Your account will remain safe, but you will be forced to reset your credentials.
To avoid this, we can use nuxt (which has a server side) to send our notification from the server. So we will store all our logic in a nuxt server route.
1. Creation of a Nuxt API
Start by creating the file /server/api/hn/[type].post.js. This file will be automatically interpreted by Nuxt which will automatically generate an API POST route, at the following url: /api/hn/myType. The content of this file will be invisible to your users and will only be executed on the server side. So we can store our sensitive data, like our identifiers.
The name [type] allows us to include a parameter, which will allow us to send several types of notifications through the same route. Here is how we created our file:
[[javascript]]import HookNotifier from 'hook.notifier';

export default defineEventHandler((event) => {
  const hn = new HookNotifier({
    identifier: %_YOUR_IDENTIFIER_%,
    key: %_YOUR_KEY_%,
  });

  const type = event.context.params.type;

  switch (type) {
    case 'test':
      hn.sendNotification({
        object: `You've clicked on the button`,
        body: 'Congratulation',
        tags: 'test,vuejs',
      });
      break;
    default:
      break;
  }

  return 'ok';
});
2. Call our function and send the notification
We can simply go through the AJAX calls of Nuxt, namely useFetch, $fetch and asyncData. Here is an example that will be much more meaningful for you:
[[html]]<template>
  <button @click="sendMyFirstNotification">Send Notification</button>
</template>

<script setup>
const sendMyFirstNotification = async () => {
  await $fetch('/api/hn/test', { method: 'POST' });
};
</script>
Of course, this is just an introduction, add all the logic you need to make your nuxt API complete.
Conclusion
You now have the basics to integrate your first notifications on your Vue.js and Nuxt.js application. Of course, this is only a rough outline of the possibilities and we invite you to test and try Hook.Notifier to configure your notifications with variable data, insert images and internal data.
Concerning Vue.js, and the security of your data, we advise you to use an API rather than using Hook.Notifier directly in your client views. Use Strapi, your own nodeJS API or hosted functions from Lambda or Google cloud functions for example. If you want a tutorial for that, feel free to leave us a feedback via the widget below.

If you like this article, feel free to connect with us on Twitter.
If you have any questions or special requests, such as needing clarification on the terms discussed in this article, more information on a specific part, or additional articles and tutorials, please feel free to provide feedback through the widget below.